Roof Inspection App
Almost all roofing contractors perform a roof inspection and report before finalizing project needs and costs. How else would they thoroughly understand and document where condition issues exist and what parts will need to be replaced? In addition, you also provide a roof assessment report to property owners for their insurance purposes. And, performing roof inspection reports is almost a routine practice of every independent insurance adjuster.
Many roofing contractors include a roof inspection report to help them close a sale. Whether you’re a roofing contractor or an independent insurance adjuster, this article will help you create a proper checklist of what to look out for when it comes to damaged or aging roofs, and how to use your smartphone to create a detailed, professional roof report.
Roof Wear and Warranties
Like anything else which is exposed to the harsh elements of nature, roof shingles wear down over time and, while durable, they are certainly not immune to damage from excessive precipitation, falling limbs, and improper installation procedures.
Factory warranties for asphalt shingles usually range from 20 to 30 years, but those warranties only cover factory defects and premature aging. So, property owners should be advised to have their shingle roof inspected about every 5 years, as well as, right after any severe weather event affecting their area, especially if they suspect possible damage from hail, falling limbs or heavy winds.
Metal and tile roofs are also subject to wear and tear. This article touches on conditions affecting these materials, as well. But first, let’s look at how smartphone technology – specifically the iRoofing mobile app – enables contractors to produce outstanding roof inspection reports.
Creating a Roof Inspection Report with a Smartphone
It’s never been easier to create a roof inspection report. The insurance industry and its adjusters use a variety of methods to produce digital roof inspection reports and cost-out any needed repairs, based on prevailing insurance industry parts and labor coverage pricing.
Now, there is an app that enables contractors to create a professional roof evaluation report entirely on a smartphone! iRoofing set out to give contractors a simple way to document roof repair needs and save them to a customer profile, including the management of property and inspection photos. iRoofing’s roof inspection reports are ideal for formulating cost estimates that are backed up by full evidence of the roof damage. The contractor can then share a detailed report and estimate with property owners, insurance adjusters, and insurance companies. No one knows better than the roofing contractor what the proper needs are for restoring a roof after severe winds, fallen tree limbs, or torrential hail damages a roof. Even if the insurance company insists on supplemental reporting, such as an adjuster’s report, the contractor and homeowner now have reliable documentation of their own to keep the insurance company “honest.”
iRoofing’s Roof Inspection app can also serve as a means for contractors to conduct inspections of roofs they suspect are damaged or worn out due to old age. Some contractors offer to perform free inspections. By doing so, they can demonstrate to a homeowner that the roof is compromised or in its final seasons of protecting the structure from leaks. This can lead to lucrative roof repair or replacement jobs.
How iRoofing's Roof Inspection Report Tool Works
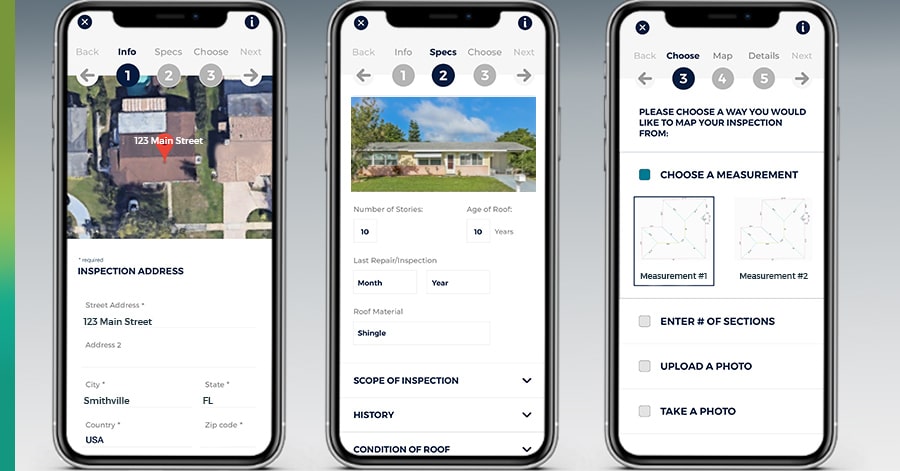
- Prior to conducting an inspection, the contractor creates the client account in iRoofing’s in-app customer database.
- Once the customer account is selected, a series of task bars appear, including “Inspection Report Tool”
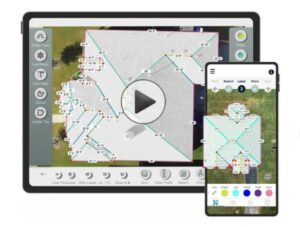
- By tapping on “Inspection Report Tool,” a screen appears showing the property’s satellite overhead image.
- Now, from the image on the phone screen, the contractor can zoom in to add annotations to clearly indicate the precise sections of the roof exhibiting damage.
- If a contractor prefers to use a drone image or roof diagram instead of a satellite image, all he needs to do is access another photo already saved to the customer profile or upload a new photo, diagram or blueprint. learn more about drone roof inspection software
- Once the selected overhead image is annotated, it will bear a timestamp; the name of the user performing the inspection; and his company’s name – data is already stored in the user account.
- Next, the contractor details the specifications of the inspection, starting with a picture identifying the property – usually a front view of the house or building.
- The next step is creating the photo evidence of the roof conditions which starts by selecting a “preferred method for noting inspection details..” (from a Measurement, from an Uploaded Photo, or Manually)
- As the contractor notates the damaged sections of the house with the apps drawing and typing tools, each separate issue is automatically assigned a section number.
- The next step is to create details for each section, including a title (i.e. “Buckled roof decking”); close -up photos (which can be snapped with the smartphone and automatically placed in a report-in-progress); descriptions for each photo and a drawing tool to point out specific issues.
- That’s it! As soon as the contractor finishes the report – all on his smartphone – he taps “Report” and a highly professional, illustrated Roof Inspection Report is generated with his company branding right at the top. Now he can send the full report via email to the property owner, insurance adjuster, or insurance company.
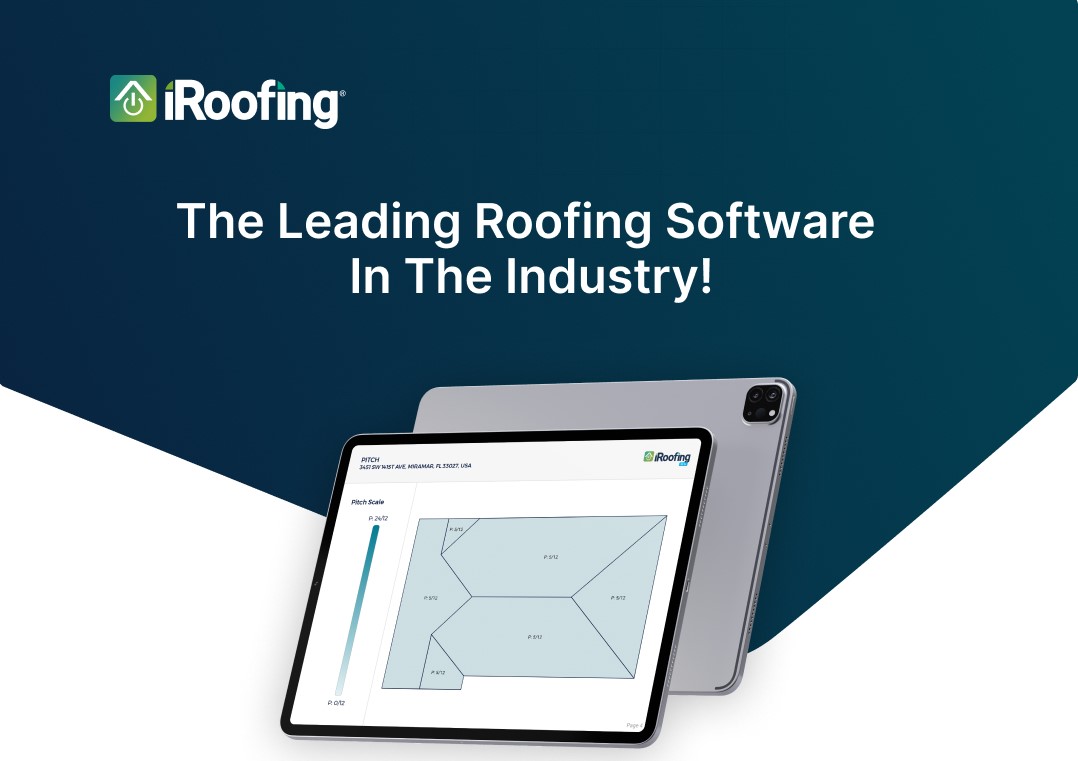
- The specifications section contains input fields for the number of stories (floors); age of the roof; last repair date; roof material; and additional free-form fields to describe the scope of the inspection and matters relating to the condition and workmanship of the roof.
Roof Inspection Checklist
Here is a guide to some of the common and not-so-common roof damage issues associated with asphalt, metal, and tile roof materials. Roofing pros and independent insurance adjusters look for these roof conditions as they go through their roof inspections checklists.
Types of Damage to Shingles

Rain, Snow, and Hail
Precipitation has always been a factor in challenging a roof’s integrity. Often, poor installation is the reason for leaks and compromises to the decking underneath the roof. But, there are other causes of damage from water including neglected gutters which can clog and cause water to pool in areas and remain there until it evaporates. Trapped moisture on a roof can result in algae built up, too. Hail can actually cause surface damage to asphalt tiles, reducing the lifespan of the material.
Wind
Strong winds can actually lift shingles off the roof decking. Even the loss of one shingle can lead to extensive damage, sooner or later. Wind can also compromise the underlayment which is key to a roof’s water-shedding capability.
Aging
When gutters appear to contain a lot of shingle granules, it’s an obvious sign that the roof material is losing its protective surface particles. The granules on most asphalt roof shingles are there to give the material added weight and deflect the ultraviolet rays of the sun.
Sunlight
Nature’s elements can be harsh. Even the warm sunshine we find so pleasant is destructive when confronted all day, every day for years and years. Rooftops are continuously bombarded with ultraviolet rays – a form of radiation. Eventually, roof damage occurs in the form of thermal splitting, cracking, blistering, curling, and cupping of shingles.
Improper Installation
Flashing is the main culprit in roof damages due to poor installation. A drip edge is a flashing material that contractors install along the edge of a roof. A missing drip edge flashing can cause a number of issues including promoting insect infestation, encroachment of wind-driven moisture under the roof edges, and the promotion of soffit and fascia rot.
Poor installation comes in other forms, too – Improper shingle overhangs at eaves, careless nail placement or use of nails prone to rusting, and improper application of the starter strip can cause water infiltration and vulnerability to shingle loss in windy conditions.
Types of Damage to Metal Roofs
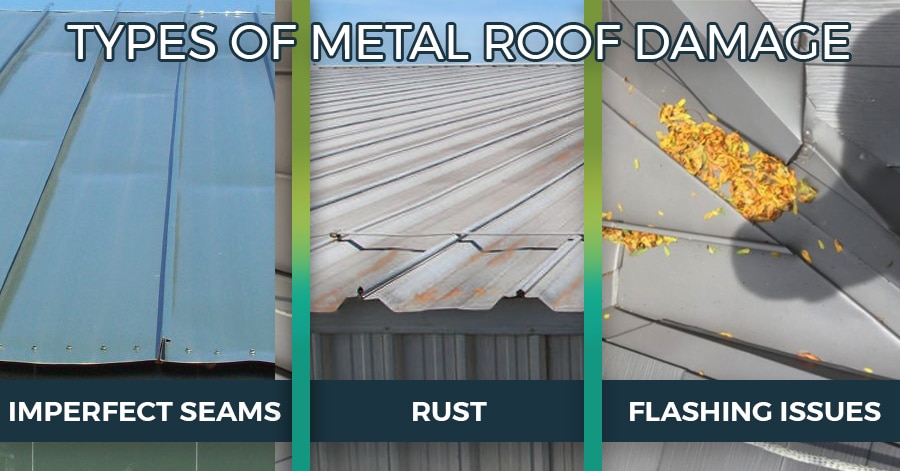
Imperfect seams
Varying weather conditions and outside temperatures cause metal to contract and expand. Seams, where metal roofing sheets overlap, can separate as screws slowly become dislodged. Now, the roof is prone to condensation. Such a build-up of moisture can cause damage to the underlying decking.
Damaged flashing
Sometimes flashing can pull apart, promoting water infiltration underneath the metal roofing. Any moisture that penetrates the roof decking can cause buckling or even rotting. Water underneath the metal roofing can corrode the underside of the roof panels, too.
Rust
Eventually metal rusts. It may take years for rust to seriously compromise the integrity of a metal roof, but corrosion is always a factor to pay attention to in a metal roof inspection. Over time, severe rust can cause pinholes in the metal panels allowing water to leak in.
Types of Damage to Clay & Concrete tiles
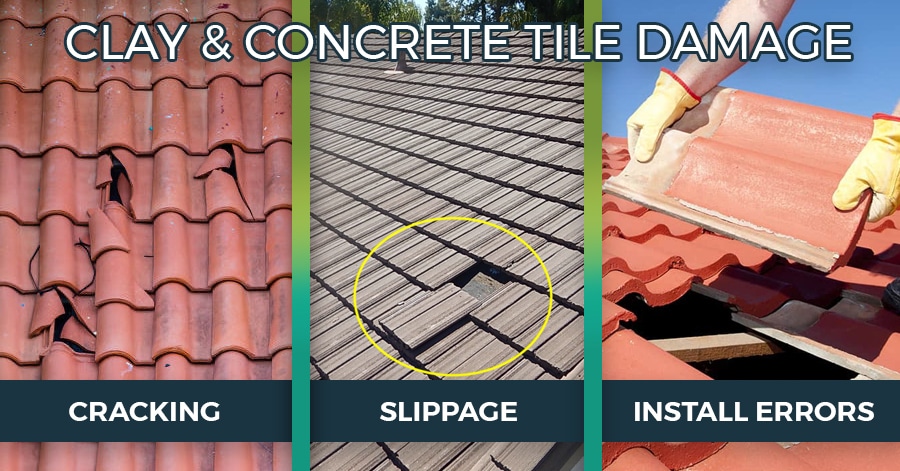
Defective cracking
Damage to roof tiles can occur even before they’re ever installed! Clay and concrete tiles go through processes of firing and curing during which fracturing can occur. Cracks can hardly be noticeable but they can lead to water infiltration issues soon after installation. Likewise, “wet breaks” are possible before the tiles are cured or fired. Look for such material defects during a tile roof inspection.
Tile slippage
Roof tiles sometimes slip out of place during strong storms, when winds and rain are more likely to dislodge the material. Tiles can also slip after nails corrode and break over time.
Certain types of tile roofing can exhibit efflorescence. The naturally occurring salts in the raw material of some roof tiles migrate to the surface and form a whitish coating. This process often indicates that the material is actually absorbing an inordinate amount of moisture. It’s an indicator that the material is approaching the end of its usefulness as a barrier to the natural elements.
Improper Installation
Again, tile roof installations with improper flashing applications will cause the same types of damage common to other roof types. Tile roofs are common on low-slope roofs and proper installation of the underlying, waterproof membrane is critical to a tile roof’s longevity.
Speed-up Your Roof Inspection Capabilities
If you think roof inspections are too time-consuming or aren’t profitable enough, maybe you should reconsider…. Try a more efficient, do-it-yourself approach made possible by smart technology. You can make roof inspections a marketing strategy as well as a valuable service to customers. A residential roof inspection report can help property owners understand if their roof is damaged or nearing the end of its lifespan. With free or low-cost roof inspection reports, you can begin to build a solid relationship with property owners and position your company as their first choice for any major roof replacement or repair work!